In summary:
- Adopt a « conservation mindset »: your goal is to preserve history and character, not create a new-looking piece.
- Always begin with the least invasive method, starting with a thorough but gentle cleaning.
- Prioritize reversible repairs, using materials like traditional hide glue over modern, permanent adhesives.
- Diagnose issues like woodworm and loose joints accurately before attempting any treatment.
- Document everything with photos before, during, and after to preserve the piece’s provenance and value.
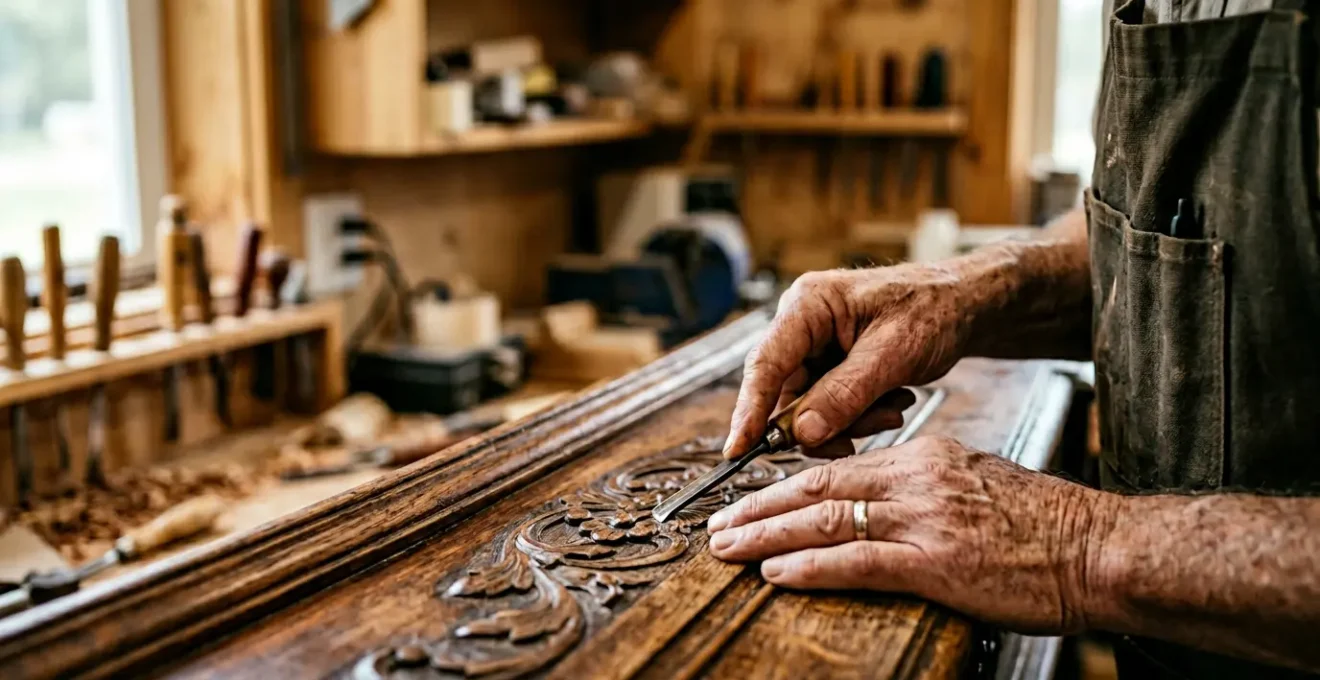
You’ve found it: the perfect, dusty piece of furniture at a thrift store or flea market. A dining table with beautiful lines hidden under a scratched finish, a chair with a slight wobble but incredible character. The immediate impulse is to « fix it up »—to sand away the imperfections and make it strong and shiny. This approach, however, is often the fastest way to destroy the very things that make an antique valuable: its history, its patina, and its authenticity. As a professional restorer, I can tell you the fundamental difference between amateur repair and professional conservation lies in a simple shift in perspective.
Most DIY guides focus on achieving a flawless, modern look. They recommend aggressive sanding, permanent glues like PVA or epoxy, and thick polyurethane varnishes. While these methods can make a piece functional, they erase its story. The true art of restoration is not about transformation but about conservation and minimal intervention. It’s a diagnostic process, much like a doctor treating a patient, where the first rule is always « do no harm. » The goal is to stabilize the piece, address its functional issues, and gently bring its original beauty back to the surface, all while making choices that another restorer could undo a century from now.
This guide is built on that professional philosophy. We won’t be talking about turning your antique into a factory-fresh item. Instead, we’ll walk through the same decision-making process a conservator uses. We will explore how to assess damage, choose the right materials for reversible repairs, and make informed decisions about finishes and hardware that respect the piece’s integrity. By adopting this conservation mindset, you can revive your find for modern use without stripping away its soul.
This article will guide you through the key considerations for a successful and respectful restoration. The following sections break down the most common challenges, from structural repairs to cosmetic finishes, providing a clear framework for your project.
Summary: How to Restore Antique Furniture: A Restorer’s Guide to Preserving Value and Patina
- Chemical Stripper vs Sanding: Which Method Is Safer for Delicate Veneers?
- Woodworm Holes: How to Tell If They Are Active and How to Treat Them?
- Loose Joints: How to Re-glue a Chair Leg That Wobbly?
- French Polish vs Varnish: Which Finish Is Best for a Dining Table?
- Matching Brass Handles: Where to Find Period-Correct Replacement Knobs?
- Door Handles and Knobs: The Small Change That Modernizes a Whole House
- Reclaimed Wood: How to Source and Treat Old Timber for Furniture?
- How to Plan Creative DIY Home Improvement Projects That Add Real Value?
Chemical Stripper vs Sanding: Which Method Is Safer for Delicate Veneers?
The first major, and potentially most destructive, decision in any restoration is how to remove a failing finish. The common impulse is to reach for an orbital sander, but this is often a catastrophic mistake, especially with veneered pieces. A veneer is a paper-thin layer of decorative wood glued to a less expensive core. Aggressive sanding can burn through it in seconds, permanently destroying the surface. Before you even consider either method, you must adopt a holistic planning process.
Your Action Plan: The « First, Do No Harm » Conservative Restoration Audit
- Assessment and Documentation: Photograph the piece from all angles. Document existing damage, test finishes in an inconspicuous spot, and create a written condition report.
- Minimal Intervention: Always begin with deep cleaning using appropriate solvents for wax or dirt. Tighten existing hardware and perform only minor, non-disassembly glue repairs first.
- Reversible Repairs: If cleaning isn’t enough, disassemble only the loosest joints. Clean old glue with reversible methods (e.g., warm water for hide glue) and make repairs that can be undone.
- Invasive Restoration (Decision Point): Only proceed to chemical stripping or major structural work if it is absolutely necessary and you have documented reasons to justify it.
- Final Documentation: Maintain a detailed log of all repairs performed, materials used (e.g., « hide glue, » « shellac finish »), and store before/after photos to create a provenance record.
For delicate surfaces, the choice between mechanical and chemical removal is critical. Chemical stripping, while messy, works by dissolving the old finish, which is then scraped or washed away. This process doesn’t abrade the wood surface itself, making it fundamentally safer for veneers. As the experts at New Life Huntsville Furniture Restoration advise:
Chemical stripping is your better option for a veneered piece. If you have sanded veneer and feel comfortable doing, it can certainly be done, just be patient, start at 100 or 120 rather than a 60 or 80 grit.
– New Life Huntsville Furniture Restoration, Furniture Stripping: to sand or not to sand?
This advice highlights the risk. While sanding is possible, it requires extreme care and a high-grit sandpaper to avoid disaster. The thinness of the veneer is the critical factor, as it can be less than a millimeter thick on many antique pieces. Visualizing this delicacy is key to understanding the danger.
As this close-up of a wood veneer shows, the material’s beauty is in its fine, fragile structure. A power sander is a blunt instrument against such a surface. Unless you are highly experienced, a gentle, targeted chemical strip is the professional’s choice to preserve the integrity of both the veneer and the patina of the wood beneath.
Woodworm Holes: How to Tell If They Are Active and How to Treat Them?
Those tiny, peppered holes in your antique find can be a source of major anxiety. Are they a sign of a long-dead infestation or an active colony of wood-boring insects chewing away at your furniture? Acting without a proper diagnosis is a common mistake. Dousing a piece in harsh chemicals is unnecessary if the damage is old, and ignoring an active problem can lead to structural failure. The key is to look for evidence of recent activity, a substance known as frass.
Frass is the fine, powdery dust created by boring larvae. Its appearance is the single most reliable indicator of an active infestation. To check for it, place a dark piece of paper or cloth under the affected area and give the furniture a few sharp taps. If dust falls out, examine it closely. Fresh frass from an active infestation will be light-colored and feel slightly gritty. Old, inactive frass is typically darker, clumpier, and may be stuck together by humidity over the years. If you find fresh frass, the infestation is active and requires treatment.
Once you’ve confirmed an active infestation, you must prepare the piece for treatment by vacuuming all holes and surfaces to remove frass and removing any surface wax or thick varnish that could prevent the treatment from penetrating. While many hardware stores sell liquid woodworm killers that can be injected into the holes, professionals often turn to more sophisticated, less-invasive methods for valuable pieces.
Case Study: Controlled Atmosphere Technology for Delicate Antiques
For high-value or delicate antique furniture, professionals often use a method called Controlled Atmosphere Technology (CAT). This process involves placing the furniture inside a sealed chamber and replacing the oxygen with inert gases like nitrogen or carbon dioxide. This non-toxic method suffocates the insects at all life stages—from egg to adult—without leaving any harmful chemical residues on the wood or finish. A major advantage is its ability to penetrate upholstery, allowing a whole chair or sofa to be treated without having to remove and potentially damage the original fabric.
Loose Joints: How to Re-glue a Chair Leg That Wobbly?
A wobbly chair is perhaps the most common ailment of old furniture. The temptation is to squeeze some modern wood glue into the gap and hope for the best. This is a cardinal sin in professional restoration. Modern PVA glues (the common white or yellow wood glues) create a plastic-like bond that is incredibly strong but almost impossible to remove without damaging the wood. Furthermore, they don’t bond well to old, previously used glue. Using them makes future repairs a nightmare. For true antique restoration, there is only one correct choice: hide glue.
Hide glue, made from animal collagen, has been the furniture maker’s choice for centuries. Its primary benefit is reversibility; it can be softened and released with heat and moisture. This means a joint can be disassembled for repair cleanly, now or 100 years from now. As one restorer on the FineWoodworking forum puts it, the wrong glue is a curse:
If they are antique chairs I would only use hide glue. It bonds to existing hide glue and is reversable. PVA, polyurathanes, epoxy, chair doctor and sometimes contact cement are the bain of antique restorers lives.
– FineWoodworking Forum Member, Which glue for chair repair – FineWoodworking Forum
The repair process itself should be as meticulous as the choice of glue. A successful re-glue isn’t about forcing glue into a joint; it’s about disassembling, cleaning, and reassembling with precision. The mortise and tenon joint is a perfect example of traditional craftsmanship designed to be repairable.
Before any hide glue is even heated, a « dry-fit » rehearsal is essential. This involves completely assembling the chair without glue and applying your clamps. This practice run ensures all parts fit perfectly and that you have a clear plan of action, as hot hide glue has a limited open time before it starts to gel. You must meticulously clean the old glue from both the mortise (the hole) and the tenon (the peg) to ensure a strong, wood-to-wood bond.
French Polish vs Varnish: Which Finish Is Best for a Dining Table?
Choosing a finish is a balance between historical accuracy and modern practicality. For a piece like a dining table that will see daily use, this decision is critical. The two most commonly discussed options represent opposite ends of the spectrum: traditional French polish and modern polyurethane varnish. A French polish is not a product, but a technique of applying many thin layers of shellac. It produces a stunning, deep finish that feels like part of the wood itself. However, it offers very little protection. According to professional French polishing specialists, a shellac finish is particularly sensitive to water, alcohol, and heat damage, making it unsuitable for surfaces where hot cups or spilled drinks are common.
On the other hand, a polyurethane varnish is a modern synthetic coating that creates a thick, plastic-like film on the wood. It is exceptionally durable and resistant to heat, water, and scratches, making it a practical choice for a high-traffic family table. However, it looks and feels artificial, completely obscuring the natural texture of the wood. It is also extremely difficult to repair; a deep scratch or water ring often requires sanding the entire surface back to bare wood and starting over.
Fortunately, there is a third option that offers a fantastic compromise: modern hardwax oils. These finishes penetrate the wood rather than sitting on top, providing good durability while maintaining a natural look and feel. Most importantly, they are spot-repairable. A scratch can be lightly sanded and re-oiled, blending seamlessly with the surrounding finish. The choice ultimately depends on your lifestyle and how the piece will be used.
This comparative table helps to frame the decision based on your priorities. For a dining table, durability and repairability are often the most important factors, making hardwax oil a superior choice over both traditional and modern film finishes.
| Finish Type | Historical Accuracy | Durability (Modern Use) | Repairability | Best For |
|---|---|---|---|---|
| French Polish (Shellac) | Excellent – Traditional 18th-19th century technique | Low – Sensitive to water, alcohol, and heat | Excellent – Easy spot repairs, melting finish | Display pieces, low-use antiques, historical restoration |
| Polyurethane Varnish | Poor – Modern synthetic finish | Excellent – Highly resistant to water, heat, scratches | Poor – Requires complete sand-back for repairs | Dining tables with kids, high-traffic surfaces, modern use |
| Hardwax Oil (Rubio/Osmo) | Moderate – Modern but natural appearance | Good – Better than shellac, repairable unlike varnish | Excellent – Easy maintenance and spot repair | Balance of durability and patina preservation, family dining tables |
Matching Brass Handles: Where to Find Period-Correct Replacement Knobs?
Hardware is the jewelry of furniture. A single missing or broken pull can disrupt the entire aesthetic of a piece. Replacing it isn’t as simple as buying a new knob from a hardware store. To preserve authenticity and value, the replacement must be period-correct in style, material, and scale. This requires a bit of detective work, or what I call « hardware forensics. » Your first step is to analyze the evidence left on the furniture itself.
Examine the « ghost » outline or shadow left by the original backplate. Measure the distance between the screw holes. These clues tell you the size and shape of what you’re looking for. Next, you need to identify the furniture’s style period, as hardware styles are distinct historical markers. For example, Hepplewhite (c. 1780-1800) furniture often features stamped brass oval backplates, while earlier Chippendale (c. 1750-1780) pieces are known for their heavy, cast brass bail pulls with ornate backplates. Armed with these details—style, dimensions, and material—you can begin your search at architectural salvage yards, online antique hardware specialists, or even eBay.
But what if you find a reproduction that is the right shape and size, but its bright, polished brass finish sticks out like a sore thumb against the beautifully patinated originals? This is where you can use a professional trick to age the new hardware for a seamless match.
DIY Case Study: Brass Patination for Seamless Hardware Matching
When an authentic period handle is unavailable, a new brass reproduction can be artificially aged to blend in. One effective method is ammonia fuming. This involves suspending the new brass piece in a sealed container (like a plastic tub with a lid) over a small dish of household ammonia for 24-48 hours. The fumes react with the brass, creating a natural, dark patina that mimics decades of oxidation. For a quicker but less uniform result, applying a solution of vinegar and salt with a cloth will also accelerate the aging process. These methods create an authentic-looking aged finish that allows a new piece to blend seamlessly with original antique hardware.
Door Handles and Knobs: The Small Change That Modernizes a Whole House
While the title suggests a whole-house update, the principle applies directly to antique furniture: should you restore the original hardware or replace it with something modern to better fit your home’s decor? This is a contentious issue. For a purist, replacing original hardware is unthinkable as it diminishes the piece’s historical integrity and monetary value. However, for a thrift store find with no significant provenance, updating the hardware can be a reversible way to bridge the gap between vintage charm and contemporary style.
The decision to restore or replace should be based on a clear-eyed assessment of the piece itself and your goals for it. Is the hardware original and unique to the piece? Is the furniture a valuable antique from a known maker? If the answer to either is yes, you must always restore the original hardware. Gentle cleaning with a soft brush and mild soap, or a specialized brass cleaner if appropriate, can revive it without erasing its desirable patina.
If, however, the piece is a more common vintage item and the original hardware is damaged beyond repair or simply not to your taste, replacement is a valid option. The key is to see it as a reversible update. Keep the original hardware in a labeled bag, so you or a future owner can restore it to its original state. Choosing a modern handle that respects the scale and screw-hole pattern of the original will make this swap cleaner and easier to reverse.
This decision framework can help you navigate the choice. The most important factor is always the originality and value of the piece. For anything with historical significance, the answer is always preservation.
| Factor | Restore Original Hardware | Replace with Modern Hardware |
|---|---|---|
| Hardware is original to piece | ✓ Always restore | ✗ Reduces value and authenticity |
| Piece has significant monetary/historical value | ✓ Preserve originality | ✗ Inappropriate for valuable antiques |
| Hardware is functional | ✓ Clean and reuse if working | Consider if broken beyond repair |
| Common vintage/thrift find | Optional – depends on aesthetic goals | ✓ Reversible update acceptable |
| Desire modern interior harmony | May create style clash | ✓ Bridges vintage piece to contemporary space |
Reclaimed Wood: How to Source and Treat Old Timber for Furniture?
Sometimes, damage to an antique is more severe than a wobbly leg or a scratched finish. A piece may have a chunk of wood missing, a split panel, or severe rot that requires replacement. Using brand new wood for these repairs is a glaring error. New wood has a different color, grain density, and it will react to finishes and age differently than the surrounding antique timber, making the repair stick out more over time. The professional solution is to use reclaimed wood of a similar age and species.
Sourcing old timber can be a hunt in itself. Architectural salvage yards, deconstruction companies, and even other broken, inexpensive antique furniture can be excellent sources. However, before using any reclaimed wood, a strict safety and preparation protocol is mandatory. Old wood can hide dangers like embedded nails that will destroy your tools, or more seriously, lead paint. Always test painted wood from before 1978 for lead before any sanding or cutting. You must also assess the wood for structural integrity, checking for rot or active pest damage.
For the most discerning restorations, where a repair must be truly invisible, conservators employ a strategy known as the « donor wood » concept. This takes the idea of using old wood to the highest level of precision.
The Donor Wood Concept for Perfect Period Matching
Professional antique restorers use the « donor wood » strategy for high-value pieces. This involves sourcing an inexpensive, broken piece of furniture from the exact same era, and ideally the same maker, as the piece being restored. For instance, to repair a damaged leg on a valuable 1920s mahogany dresser, a restorer might purchase a cheap, broken 1920s mahogany nightstand. This « donor » piece provides wood that is not only the correct species but also has the same age, color from oxidation, and patina. It has lived in the same world for the same amount of time. This ensures that the repair timber will behave and look identical to the original, making the final repair virtually invisible and preserving the piece’s authenticity in a way no new wood ever could.
Key takeaways
- The Conservation Mindset: Your primary goal is to preserve the piece’s history, not make it look brand new. Every decision should be guided by the principle of « do no harm. »
- Prioritize Reversibility: Always choose repair methods and materials (like hide glue) that can be undone by a future restorer. Avoid permanent, modern adhesives and finishes on valuable pieces.
- Diagnosis Before Action: Thoroughly investigate any issue—from a loose joint to suspected woodworm—before you begin treatment. A correct diagnosis prevents unnecessary and potentially damaging work.
How to Plan Creative DIY Home Improvement Projects That Add Real Value?
Applying the conservation mindset to your antique furniture project transforms it from a simple DIY task into a planned act of preservation that adds real, lasting value. The planning phase is the most critical part of the entire process. It’s where you slow down, assess the piece holistically, and create a roadmap that prioritizes minimal intervention. This thoughtful approach not only protects the furniture’s integrity but also saves you from costly and irreversible mistakes.
A crucial part of this planning is budgeting for the unknown. Antiques are notorious for hiding problems. What looks like a simple surface crack might conceal deeper structural rot. Because of this, it’s a standard practice for professionals to build in a significant financial cushion. In fact, professional furniture repairers recommend including a 30-50% contingency fund for antique restoration projects to account for these hidden issues that so often emerge once work begins. This foresight prevents you from having to cut corners later on due to an unexpected expense.
Ultimately, a successful restoration project is defined not by the dramatic « before and after » photos, but by the subtlety of the work. The best repairs are the ones you can’t see. By researching the piece’s history, using period-appropriate materials, and documenting your process, you become more than just a repair person—you become a custodian of that object’s story. You are adding to its life, not erasing its past.
By embracing this patient, respectful, and informed approach, you can confidently bring your thrift store finds back to life, ensuring they are cherished for generations to come, with their history and value fully intact. The next logical step is to start your own project by carefully assessing your piece and creating your own « do no harm » plan.