In summary:
- True home value comes from executing DIY projects with professional techniques, not just completing a task.
- Focus on « architectural cohesion » by integrating new elements like trim and hardware so they look like part of the original design.
- Mastering preparation and using the right materials (like shellac primer on laminate) is non-negotiable for a durable, « factory finish. »
- Strategic projects, such as smart garage conversions or well-designed extensions, add more value than simply adding maximum square footage.
Every homeowner with a creative spark dreams of transforming their living space into something truly personal. You see the potential in that blank wall, those dated kitchen cabinets, or that underused garage. The internet is filled with tempting « easy DIY » lists, promising a weekend project will dramatically boost your home’s value. But there’s a nagging fear: the fine line between a brilliant custom feature and a project that just screams « bad DIY. » Many guides focus on what to do—paint the door, add a shelf—but they rarely explain *how* to do it in a way that looks expensive, intentional, and truly integrated.
The common approach often leads to results that feel temporary or slightly « off. » A freshly painted cabinet starts peeling because the surface wasn’t prepped correctly, or a peel-and-stick backsplash looks flat and plastic compared to real tile. These projects might offer a short-term refresh, but they don’t contribute to the deep, lasting value that comes from quality craftsmanship. The secret isn’t just in choosing the right project; it’s in adopting a different mindset, one that prioritizes technique, preparation, and strategic design over quick fixes.
But what if the key to adding real value wasn’t just about the project itself, but about executing it with the precision of a craftsman and the eye of a designer? What if you could learn the secrets to making an IKEA bookcase look like a custom built-in, or getting a sprayed-on-smooth finish with just a roller? This is where real transformation happens. It’s about moving beyond the surface-level upgrade and into the realm of thoughtful, high-impact home improvement.
This guide will walk you through eight creative projects, but with a crucial difference. We will deconstruct the techniques and strategic thinking required to elevate each one from a simple DIY task to a professional-quality feature that adds tangible, long-term value to your home. Get ready to learn how to think like a pro, even when you’re the one holding the tools.
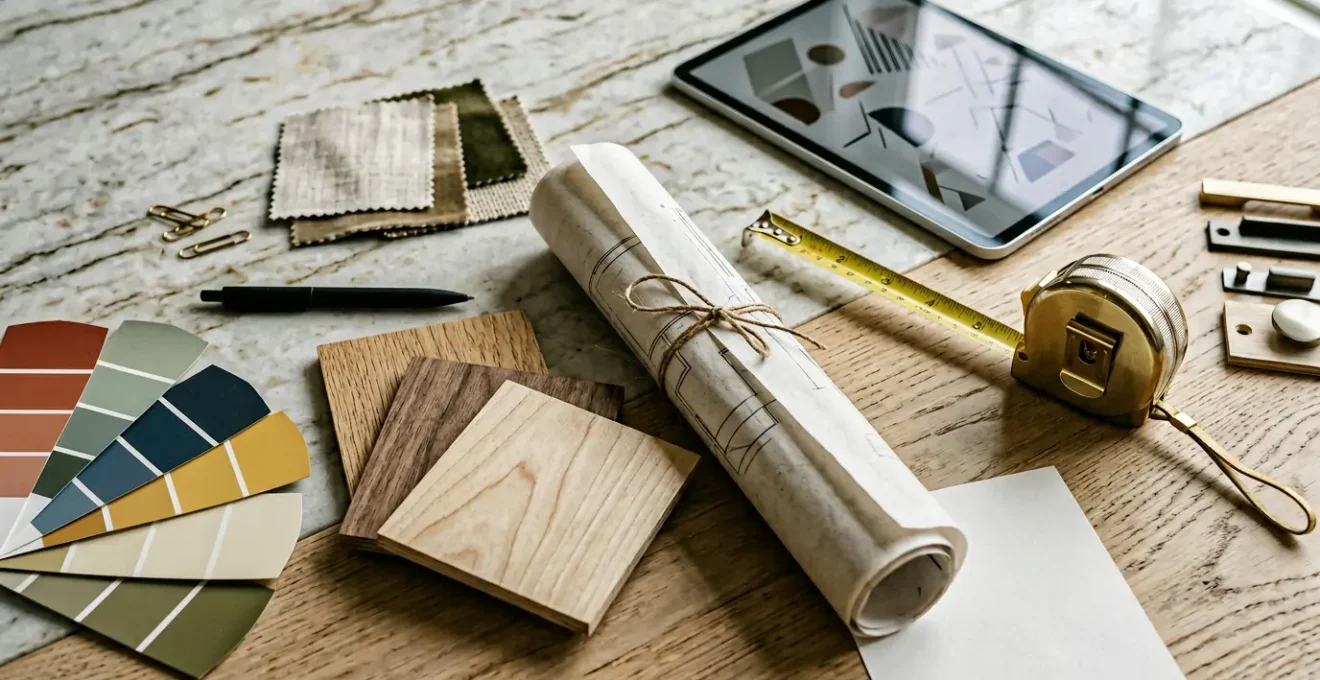
To help you navigate these value-adding projects, we’ve structured this guide to cover everything from custom interior details to strategic structural changes. Explore the topics that spark your interest and discover how to execute them flawlessly.
Summary: Creative DIY Projects for Genuine Home Value
- Built-in Shelves: How to Hack IKEA Billy Bookcases for a Custom Look?
- Wainscoting vs Shiplap: Which Wall Paneling Style Suits a Modern Home?
- Kitchen Cabinet Painting: How to Get a Factory Finish with a Roller?
- Peel-and-Stick vs Real Tile: Is Adhesive Tile a Durable Solution for Kitchens?
- Door Handles and Knobs: The Small Change That Modernizes a Whole House
- Garage Conversions: Do You Need Planning to Turn a Garage Into a Living Room?
- LED Strips: How to Cut and Connect Them for Under-Cabinet Lighting?
- How to Maximize Permitted Development Rights to Add Value to Your Home?
Built-in Shelves: How to Hack IKEA Billy Bookcases for a Custom Look?
Standard, freestanding bookcases can often feel like an afterthought, failing to integrate with a room’s architecture. The ultimate solution for sophisticated storage is custom built-in shelving, but professional quotes can be astronomical. This is where strategic deconstruction comes in: by hacking the famously versatile IKEA Billy bookcase, you can achieve a high-end, bespoke look for a fraction of the cost. The key is to hide its flat-pack origins with custom trim, a solid base, and a flawless paint job that makes it appear as if it was always part of the house.
Case Study: The $800 Built-In That Beat an $8,000 Quote
To understand the massive value proposition, consider the homeowner who transformed their living room by turning four Billy bookcases into a sophisticated media center. While a custom cabinet maker quoted $8,000 for the job, the entire DIY project—including bookcases, height extenders, doors, and paint—cost only around $800. This project demonstrates that a 90% cost reduction is possible without sacrificing the custom aesthetic, adding significant storage and perceived value to the space.
The transformation hinges on a few crucial steps. You’ll build a sturdy lumber base to elevate the units, secure them to the wall, and then bridge the gaps with trim that matches your home’s existing style. The most critical step for a professional finish is the surface preparation. Laminate furniture is notoriously difficult for paint to adhere to, so using a shellac-based primer is non-negotiable. This creates a bond that allows your topcoat to cure into a hard, durable surface.
As this detail shows, the primer creates the foundation for a flawless paint job. After priming, filling all the pre-drilled shelf holes with wood filler is a small but vital detail that screams « custom, » removing any hint of adjustable, off-the-shelf furniture. With a high-quality cabinet paint as the final layer, your IKEA hack will be indistinguishable from a far more expensive custom installation, adding both function and significant architectural character to your room.
Wainscoting vs Shiplap: Which Wall Paneling Style Suits a Modern Home?
Wall paneling is a powerful tool for adding architectural character and texture, but choosing the right style is critical for achieving a modern look. Two popular contenders, wainscoting and shiplap, offer vastly different aesthetics. Wainscoting is traditionally more formal, featuring decorative molding on the lower portion of a wall. It’s excellent for adding elegance to dining rooms or entryways but can feel dated in a minimalist, modern space. In contrast, shiplap offers a cleaner, more versatile look.
As the Remodelista design team notes, the distinct lines of shiplap give it a contemporary edge that other paneling styles lack:
Shiplap has the strongest lines and is therefore often considered the most contemporary of all the paneling examined here. Unlike beadboard and V-groove, which can feel cozy, shiplap is a bit more dynamic, as it draws your eye around the room.
– Remodelista Design Team, The Ultimate Guide to Shiplap, Beadboard, and V-Groove Paneling
This dynamic quality makes shiplap highly adaptable. Installed horizontally, it can make a room feel wider; installed vertically, it can heighten ceilings. Its clean shadow lines work beautifully in modern farmhouse, coastal, and even transitional interiors. While classic wainscoting grounds a space with traditional warmth, shiplap offers visual movement and a graphic quality that aligns better with modern design principles. The choice ultimately depends on whether your goal is to add classic detail or contemporary character.
This comparative table breaks down the key differences to help you decide which style best serves your home’s aesthetic and functional needs, based on a detailed analysis of wall paneling styles.
| Feature | Shiplap | Wainscoting |
|---|---|---|
| Aesthetic Style | Modern farmhouse, coastal, rustic—clean lines with shadow gaps create contemporary feel | Traditional, elegant, formal—decorative molding suits classic spaces |
| Coverage Area | Full walls or ceilings—runs across entire surfaces for unified transformation | Lower third of wall only—adds decorative accent without complete room transformation |
| Installation Ease | More user-friendly—boards interlock with consistent spacing via rabbeted grooves | More complex—requires precise measuring, cutting, and molding installation |
| Visual Effect | Dynamic and eye-drawing—strong horizontal or vertical lines create visual movement | Cozy and grounded—adds warmth and protection to lower walls |
| Best Room Applications | Living rooms, bedrooms, kitchens—spaces needing warmth and character | Dining rooms, entryways, bathrooms—areas requiring wall protection and architectural detail |
| Modern Compatibility | Highly versatile—works in modern, transitional, and farmhouse interiors | Best for traditional settings—can feel dated in ultra-modern spaces unless simplified |
Kitchen Cabinet Painting: How to Get a Factory Finish with a Roller?
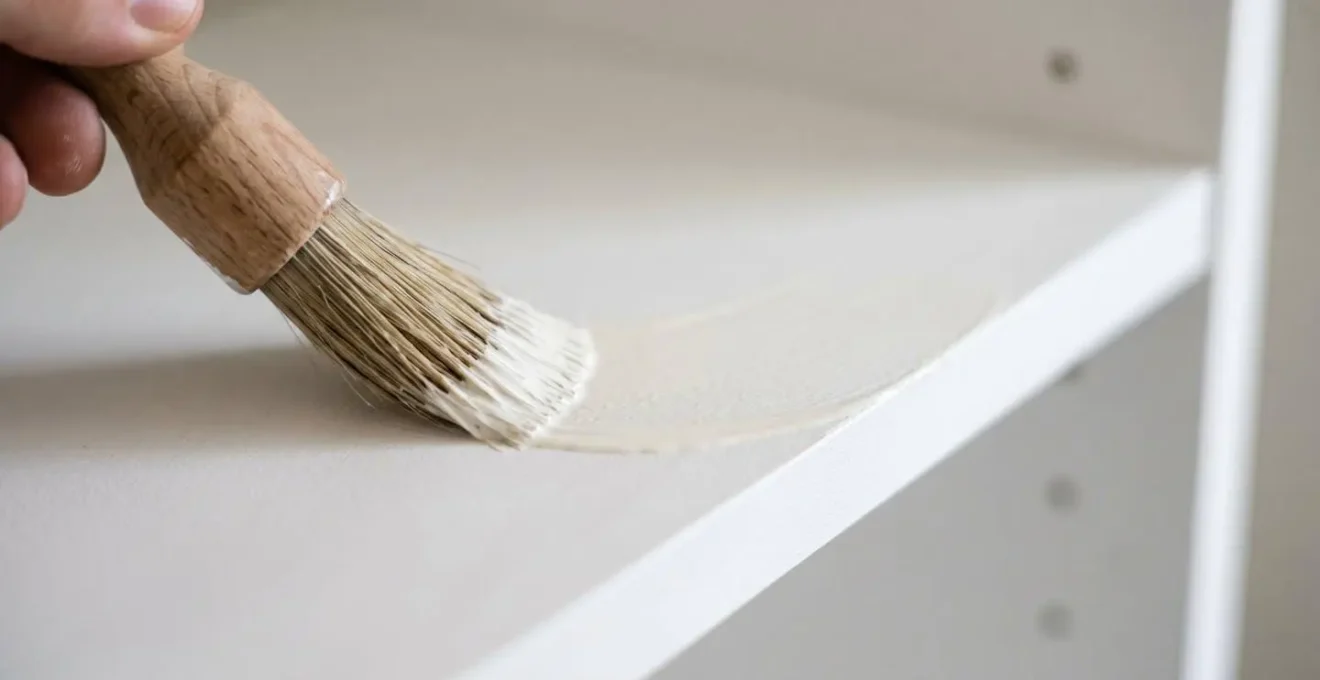
Painting kitchen cabinets is one of the highest-impact DIY projects, but the difference between an amateur job and a professional one is immense. The goal is a « factory finish »—a perfectly smooth, durable surface free of brush strokes and roller marks. This isn’t achieved by simply picking a color and starting to paint. The secret lies in a meticulous, multi-step system focused on flawless surface preparation and the right application technique. Rushing the prep is the single biggest mistake that leads to peeling, chipping, and a finish that looks anything but custom.
The process starts with thoroughly cleaning and deglossing the cabinet surfaces to remove any grease or old finish. This is followed by a light sanding to create a « tooth » for the primer to grip. For stubborn surfaces like laminate or thermafoil, a shellac-based bonding primer is essential for long-term adhesion. Once primed and lightly sanded again, the surface is ready for paint. For the smoothest application, use a high-density foam roller or a 1/4-inch nap mohair roller. These tools are designed to lay down thin, even coats without creating the texture a standard roller would.
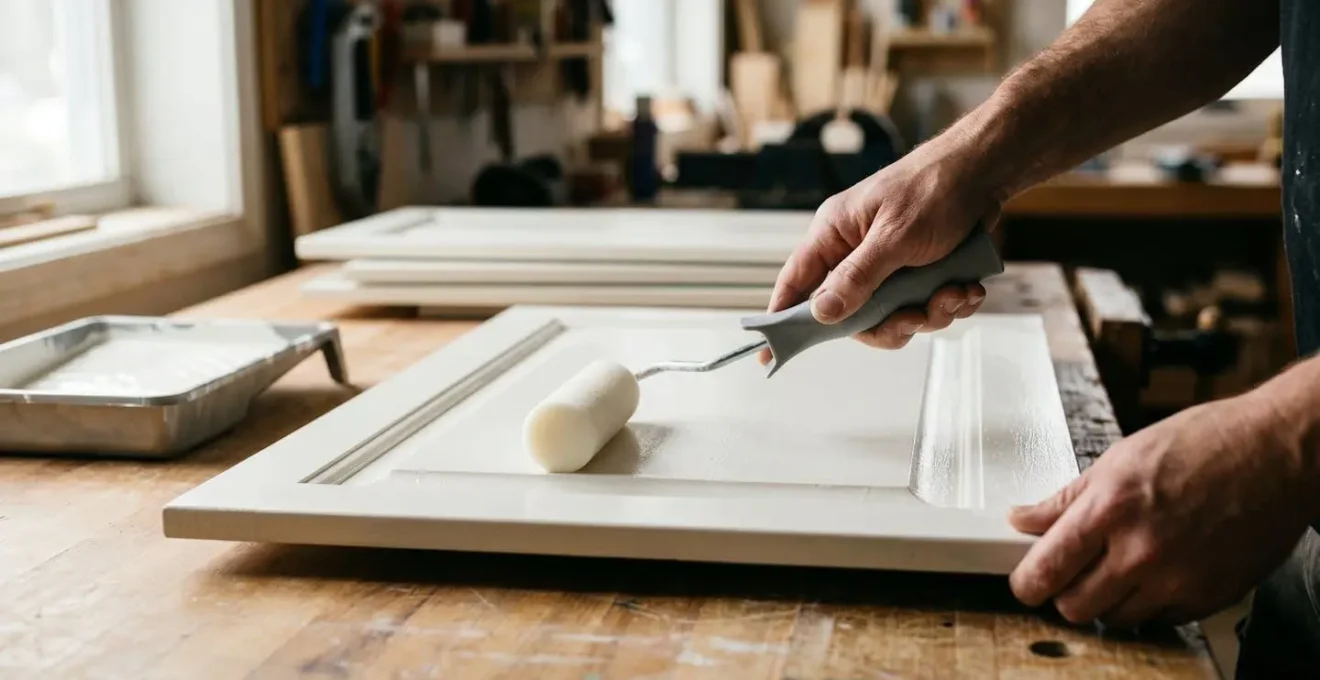
As shown here, applying paint to a horizontal surface helps prevent drips and allows the paint to level out. A pro technique to eliminate roller texture is « tipping off »: after rolling a section, lightly drag the tips of a high-quality brush in a single, long stroke across the wet paint. When combined with a premium, self-leveling cabinet paint, this method helps the finish settle into a beautifully uniform sheen as it dries. Finally, patience is a virtue; allow the paint to cure fully for several weeks to achieve maximum hardness and durability before subjecting the cabinets to heavy use.
Peel-and-Stick vs Real Tile: Is Adhesive Tile a Durable Solution for Kitchens?
For a quick and budget-friendly kitchen update, peel-and-stick tiles are an incredibly tempting option. They promise the look of a tile backsplash without the mess, time, or cost of traditional tiling. However, the crucial question for any homeowner looking to add real value is one of durability. Is adhesive tile a lasting solution or merely a stylish placeholder? The answer depends heavily on the product quality and the specific kitchen environment. Cheap, thin vinyl versions often look artificial and can fail in high-moisture or high-heat areas, like behind a stove.
Premium peel-and-stick tiles, often made with a metal or stone facade, offer a much more realistic 3D texture and better performance. They can be a great solution for low-impact areas or as a temporary fix for renters. However, even the best adhesive tiles have limitations. Their seams, unless grouted, can be vulnerable to water infiltration over time. In contrast, traditional ceramic tile, when properly installed and grouted, is a permanent, waterproof, and heat-resistant solution with a lifespan of 20 years or more. It represents a true investment in your home’s infrastructure.
Case Study: A One-Year Review of Peel-and-Stick Performance
A homeowner’s honest assessment after a year with vinyl peel-and-stick tiles provides valuable insight. While the installation was fast and affordable for a laundry room closet, the tiles began to show edge lifting in humid spots. The review concluded that while it worked as a temporary fix in a low-visibility area, it lacked the authentic depth of real tile. This real-world experience confirms that peel-and-stick is best viewed as a ‘stylish placeholder’ rather than a permanent value-add, especially in a high-use kitchen.
This table provides a clear comparison of how different tile types perform under the demanding conditions of a kitchen, helping you weigh the trade-offs between cost, convenience, and long-term value.
| Performance Factor | Cheap Vinyl Peel-and-Stick | Premium Peel-and-Stick (Stone/Metal Facade) | Traditional Ceramic Tile |
|---|---|---|---|
| Heat Resistance | Low—not suitable behind stoves, can warp or melt | Moderate—better than vinyl but still avoid direct high-heat zones | Excellent—fully heat-resistant for all kitchen applications |
| Moisture Durability | Poor—adhesive fails in high-moisture areas, tiles may fall off | Good—waterproof surface but seams can allow water infiltration without grout | Excellent—non-porous when properly grouted, ideal for wet environments |
| Lifespan | 1-3 years in kitchens before peeling/fading | 5-10 years with proper installation and maintenance | 20+ years—permanent installation adds lasting value |
Door Handles and Knobs: The Small Change That Modernizes a Whole House
It’s easy to overlook the small details, but when it comes to home modernization, few changes offer a better return on effort than updating hardware. Dated, tarnished, or builder-grade door knobs and cabinet pulls can make an entire house feel stuck in the past. Replacing them is a relatively simple and inexpensive project that has a disproportionately large impact on the overall feel of your home. Think of hardware as the « jewelry » of a room—the finishing touch that ties everything together. A sleek matte black handle or a warm brushed brass knob can instantly elevate a plain door or a set of cabinets, making them feel more custom and luxurious.
The key to success is not just replacing hardware piece by piece, but creating a cohesive hardware « story » throughout your home. This means choosing one or two finish families (like matte black and brushed brass) and using them consistently across doors, cabinets, and even light fixtures. This creates a powerful sense of visual continuity and intentional design that buyers and guests will notice, even if only subconsciously. It’s this level of thoughtful detail that separates a piecemeal update from a true home transformation. Using a substantial, heavier handle can even make a standard hollow-core door feel more premium and solid to the touch.
Your Action Plan for a Cohesive Hardware Story
- Audit all touchpoints: Systematically inventory every knob, pull, handle, and hinge in your home to identify all existing hardware styles and finishes.
- Catalogue your collection: Photograph and measure the critical dimensions of your existing hardware (backset, center-to-center pulls) to create a baseline for purchasing replacements.
- Define your style: Confront your current hardware with your home’s desired aesthetic. Does it align with the modern, traditional, or transitional feel you want to create?
- Assess the impact: Evaluate whether your current hardware feels generic and cheap or substantial and unique. This will help determine if a simple finish match or a full style upgrade is needed.
- Create your roadmap: Develop a plan to replace hardware, prioritizing high-impact rooms like the kitchen and entryway first, and budget for patching any old holes for a seamless finish.
This strategic approach to a seemingly small detail ensures that every door you open and every drawer you pull contributes to a unified, modern aesthetic, maximizing the project’s impact on your home’s value.
Garage Conversions: Do You Need Planning to Turn a Garage Into a Living Room?
Converting a garage into a living space is one of the most effective ways to add square footage and value to your home without the expense of a full extension. In many regions, this can fall under « permitted development, » meaning you may not need full planning permission as long as the work is internal and doesn’t involve enlarging the building. However, the crucial factor in adding real value is ensuring the new space feels like an integrated part of the home, not an afterthought. A successful conversion is one where a future buyer wouldn’t even realize it was once a garage.
This means going far beyond the legal minimums. The most telling sign of a cheap conversion is the « step-down » into the room. A key upgrade is raising the garage floor to match the level of the main house, creating a seamless transition. Equally important is insulation to residential standards; insulating walls and ceilings properly not only makes the space comfortable but also energy-efficient, a major selling point. Finally, integrating the new room into the home’s central HVAC system is far superior to relying on portable heaters or window AC units, cementing its status as true living space.
The exterior transformation is just as critical. Simply replacing the garage door with a wall and a standard window screams « conversion. » The goal is facade integration: using windows and siding that perfectly match the existing architecture. While these upgrades require more investment than a basic conversion, they are what truly adds value. A well-executed series of DIY updates can increase home appraisal value by 5% to 15%, and creating a flexible, « move-in ready » space like a home office or playroom is exactly what modern buyers are seeking.
LED Strips: How to Cut and Connect Them for Under-Cabinet Lighting?
Under-cabinet lighting is a kitchen feature that blends form and function, providing essential task lighting while adding a layer of ambient warmth. LED strips are the go-to solution for their efficiency and low profile, but a professional-looking installation requires more than just sticking a strip under a cabinet. The biggest pitfall of a poor DIY job is the dreaded « hotspot » effect—visible dots of light that create a cheap, distracting glare on your countertop and backsplash. The secret to a high-end, seamless glow is using an aluminum diffuser channel.
These channels, which house the LED strip, are mounted under the cabinet and feature a frosted cover that diffuses the light, creating a single, uniform line of illumination. For the best effect, mount a 45-degree angled channel near the front of the cabinet, directing the light down and back towards the backsplash. Planning the power supply is another key step. Hiding the transformer inside a cabinet and drilling small holes through cabinet partitions for the wiring creates a clean, wire-free look. When you need to cut the strip to length or go around a corner, always cut only on the designated copper cut marks and use solderless connectors for a reliable join.
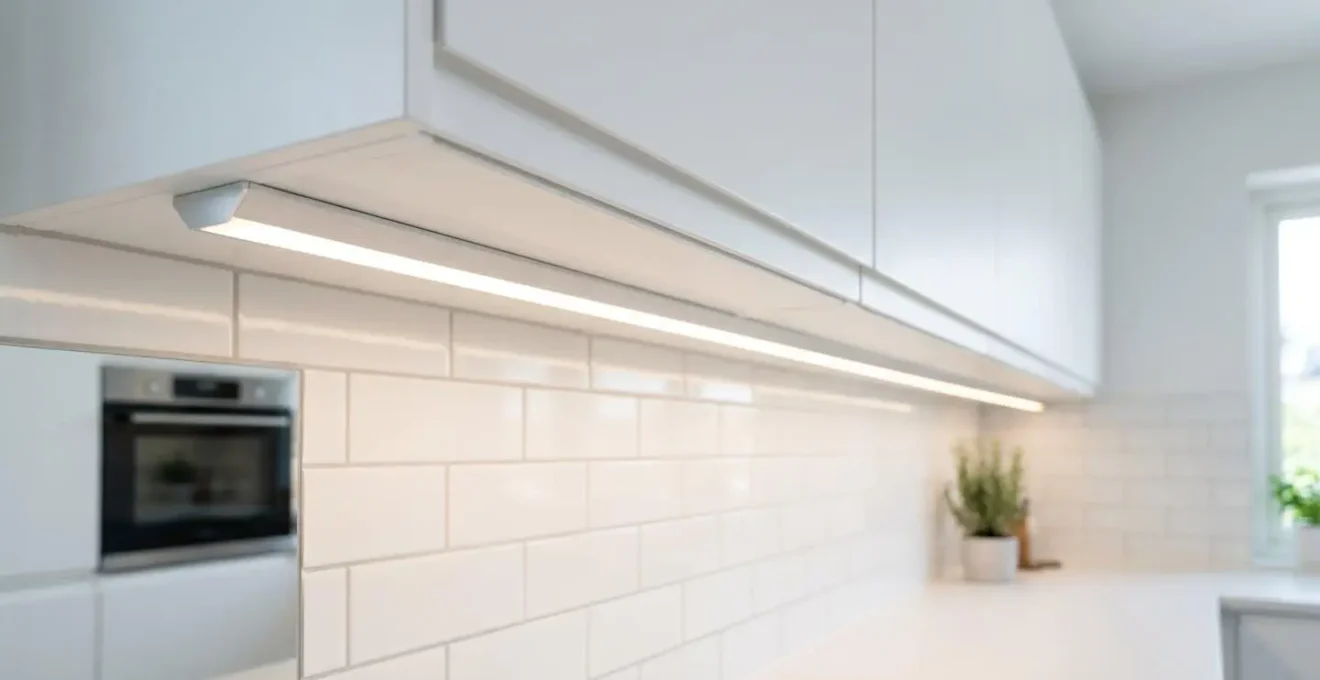
Beyond the installation technique, the quality of the light itself matters. For a kitchen, choose an LED strip with a high Color Rendering Index (CRI) of 90+. This ensures that the light renders colors accurately, so your food looks natural and appealing, not washed out. A warm-to-neutral color temperature (3000K-4000K) is typically most flattering. Done right, a modern LED lighting scheme not only improves usability but also contributes to your home’s value. Research on affordable home improvements shows that replacing old fixtures with modern LED options increases energy efficiency and gives spaces a more stylish, valuable appearance.
Key takeaways
- Architectural Cohesion is Key: The most valuable DIY projects are those that feel integrated, not added on. Match trim, create cohesive hardware stories, and blend new structures with the old.
- Preparation Over Procrastination: A professional finish in painting, tiling, or any surface work is 90% preparation. Cleaning, sanding, and using the right primer are non-negotiable.
- Quality Over Quantity: Whether it’s choosing real tile over a temporary sticker or designing a smaller, smarter extension, investing in durable materials and thoughtful design adds more long-term value than maximizing size or minimizing cost.
How to Maximize Permitted Development Rights to Add Value to Your Home?
For ambitious homeowners, « Permitted Development » (PD) rights can be a golden ticket, allowing for significant home extensions, loft conversions, and outbuildings without the lengthy process of a full planning application. However, the most common mistake is to view PD rights as a license to simply build the biggest box possible. True value isn’t added by maximizing cubic meters; it’s added by solving problems and improving the home’s flow and function. A smaller, thoughtfully designed extension that floods the kitchen with natural light will add far more value than a large, awkward addition that creates dark internal rooms.
The strategic approach is to prioritize quality of space over quantity of footage. Instead of one massive project, consider phasing multiple, smaller projects over time—a small rear extension one year, a loft conversion the next. This can be easier to manage financially and can avoid the complexities of a single, large application. Another key strategy is focusing on a specific functional gain, such as creating a dedicated home office, a utility room, or a better connection to the garden. These are the features that resonate with modern buyers.
Furthermore, design choices matter immensely. An extension that uses materials and rooflines that complement the original house will always be viewed more favorably than one that looks tacked on. This « apparent legality » and thoughtful design can prevent scrutiny from planning officers when you eventually sell. Ultimately, buyers are becoming more discerning. Analysis of future homebuyer preferences indicates that by 2026, buyers will be specifically hunting for ‘move-in ready’ homes that feature not just extra space, but also smart, flexible layouts and modern energy solutions. Integrating these elements into your permitted development project from the start is the surest way to maximize your return on investment.
Now that you’re armed with the techniques and strategic mindset to elevate your DIY projects, the next step is to choose one and start planning. Whether it’s a weekend hardware update or a long-term garage conversion, applying these principles will ensure your hard work translates into real, lasting value for your home.