The dream of growing your own food in a small apartment is not limited by a lack of balcony space; it’s enabled by smart system design.
- Vertical hydroponics, particularly Deep Water Culture (DWC), offers a resilient and forgiving starting point for beginners.
- Choosing the right plants (like lettuce and herbs) and full-spectrum lights is more critical for success than the physical size of your setup.
Recommendation: Start by mastering the basics of nutrient and pH management—this is the true engine of your indoor garden, turning water into a bountiful harvest.
For the apartment dweller with a passion for fresh food but no balcony to speak of, the dream of a home garden can feel frustratingly out of reach. The desire for crisp, organic lettuce and fragrant herbs often clashes with the reality of limited space. You’ve likely seen DIY projects online, promising a simple path to indoor farming, often involving some PVC pipes and a bucket. While these guides are a start, they often skip the most crucial part: the ‘why’ behind the ‘how’.
These tutorials present a one-size-fits-all recipe, but building a thriving indoor garden is less like baking a cake and more like engineering a miniature ecosystem. The real key to success isn’t just in assembling the parts, but in understanding the critical choices you make along the way. Your success hinges on a series of informed decisions that tailor the system to your specific environment and the plants you wish to grow.
But what if the secret wasn’t just following a blueprint, but learning to think like a system designer? This guide moves beyond the generic instructions. We will delve into the core principles of environmental control, exploring the trade-offs between different hydroponic systems, the science behind grow light spectrums, and the delicate chemistry of nutrient solutions. By understanding these fundamentals, you will be empowered not just to build a vertical garden, but to design one that is efficient, productive, and perfectly suited to your urban home.
This article provides a comprehensive roadmap, breaking down each critical decision point into a clear and manageable step. The following sections will guide you through the essential knowledge needed to turn a small corner of your apartment into a perennial source of fresh, homegrown produce.
Summary: A Design-First Approach to Your Indoor Vertical Farm
- NFT vs Deep Water Culture: Which Hydroponic System Is Best for Verticals?
- Grow Lights: Full Spectrum vs Purple LEDs for Leafy Greens?
- EC and pH: How to Mix Nutrient Solutions Without Burning Your Plants?
- Lettuce vs Tomatoes: Which Plants Thrive in a Vertical Pipe System?
- PVC Pipe Garden: How to Drill and Assemble a Vertical Tower Cheaply?
- Sheep’s Wool vs Fiberglass: Why Choose Natural Insulation for Your Loft?
- Window Sill Gardening: How to Grow Organic Lettuce in a Small Apartment?
- How to Create a Sustainable Home Environment That Reduces Your Carbon Footprint?
NFT vs Deep Water Culture: Which Hydroponic System Is Best for Verticals?
Your first major design decision is choosing the core engine of your hydroponic system. The two most common methods for vertical setups are the Nutrient Film Technique (NFT) and Deep Water Culture (DWC). While both are highly effective, they operate on different principles and offer distinct advantages, especially for a beginner working in an apartment.
NFT systems are space-efficient, circulating a thin « film » of nutrient-rich water over the bare roots of plants in a series of channels or pipes. This is excellent for fast-growing, lightweight plants. However, NFT is highly unforgiving. A pump failure or power outage can be catastrophic, as the roots can dry out and die in a matter of minutes. DWC, on the other hand, involves suspending plants in net pots over a reservoir of aerated nutrient solution. The roots are constantly submerged, creating a large buffer. In fact, DWC is far more resilient, with some systems remaining stable for several days during power outages, a huge advantage for home growers. The following table breaks down the key differences:
| Criterion | NFT System | DWC System |
|---|---|---|
| Best For | Small, fast-growing plants & scalable vertical setups | Larger crops with big root systems & R&D projects |
| Power Failure Tolerance | High risk – plants can fail if pump stops | Resilient – roots stay submerged, stable for days |
| Beginner Friendliness | Requires precision, low buffer | Most forgiving system for new growers |
| Maintenance Complexity | More parts to clean, awkward long channels | Easier to empty and clean tank |
| Space Efficiency | Excellent for vertical farming | Requires more volume, heavier system |
| Noise Level | Moderate (pump circulation) | Silent reservoir (with aeration bubbles) |
For an apartment dweller, the choice often comes down to risk tolerance and simplicity. The forgiveness of DWC makes it an ideal starting point. As The Growcer, a commercial hydroponics company, notes:
DWC is the most forgiving system for new growers and considered the most accessible technology when compared to NFT and ebb and flow systems.
– The Growcer, Comparing Hydroponic Setups: DWC vs. NFT
While NFT offers exceptional vertical scalability, the resilience and simplicity of DWC make it the superior choice for a first-time builder focused on reliability and a consistent harvest. It provides the peace of mind that a brief power flicker won’t destroy your entire crop.
Grow Lights: Full Spectrum vs Purple LEDs for Leafy Greens?
Once you’ve chosen your hydroponic system, the next critical component is light. In an apartment without a sunny balcony, you become the sole provider of this essential resource. The debate often centers on two types of LED technology: the « blurple » (blue/red combination) lights and the modern « full-spectrum » white lights. This isn’t just an aesthetic choice; it’s a strategic one that impacts plant health, energy efficiency, and your own enjoyment of the garden.
Purple lights are highly efficient from an engineering perspective. They focus energy exclusively on the blue and red wavelengths that are most crucial for photosynthesis. In fact, research from commercial horticultural lighting specialists shows that the blue and red LED combination is the most energy-efficient, converting a higher amount of electricity into usable photons for the plant. However, this efficiency comes at a cost: the light is harsh and unnatural, making it difficult to properly observe your plants for pests or nutrient deficiencies. It also makes the garden a less pleasant feature in your living space.
Full-spectrum white LEDs, on the other hand, are designed to mimic natural sunlight. They include green and yellow wavelengths, which, while less critical for photosynthesis, play a vital role in plant development and health. More importantly for the home grower, they render plants in their natural colors, making inspection easy and turning your vertical garden into an attractive, living feature. While slightly less energy-efficient, the benefits in plant health and usability are significant. For leafy greens and herbs, where real-world data demonstrates a 15-30% yield increase and better leaf development under full-spectrum lights, the choice becomes clear. The superior quality of growth and the ability to actually enjoy the look of your garden make full-spectrum white LEDs the definitive winner for an in-home setup.
EC and pH: How to Mix Nutrient Solutions Without Burning Your Plants?
If lights are the sun of your indoor ecosystem, the nutrient solution is its lifeblood. This is where many beginners falter, either under-feeding their plants or, more commonly, « burning » them with a solution that is too concentrated or has the wrong pH. Mastering two key measurements, Electrical Conductivity (EC) and potential of Hydrogen (pH), is non-negotiable for hydroponic success.
EC is a measure of the total dissolved salts in your water, which directly indicates the strength of your nutrient solution. Too low, and your plants starve; too high, and you cause nutrient burn, damaging the roots. pH measures the acidity or alkalinity of the solution, which determines the plants’ ability to absorb the available nutrients. Even with a perfect nutrient mix, the wrong pH will « lock out » essential minerals, leading to deficiencies. The ideal target for most herbs and lettuce is a pH of 5.5-6.5 and an EC between 1.0-1.6. Maintaining this delicate balance is the primary task of the hydroponic gardener.
It sounds complex, but managing it is a straightforward process of testing and adjusting. You will need a reliable digital pH and EC meter—do not skimp on these tools. They are the most important instruments in your toolkit. Instead of guessing, you adopt a methodical approach of measuring, adding nutrients, re-measuring, and then adjusting the pH. This creates a stable and predictable closed-loop ecosystem for your plants’ roots.
Your Nutrient Management Action Plan:
- Test your source water’s baseline pH and EC before adding anything. This is your starting point.
- Mix nutrients into the water according to the manufacturer’s instructions for leafy greens, then measure the EC to confirm the concentration is within the 1.0-1.6 range.
- Check the pH only *after* the nutrients are fully mixed. Use pH Up or pH Down solutions sparingly to adjust it to the target 5.5-6.5 range.
- Monitor both pH and EC at least twice a week. They will drift as plants feed and water evaporates. Early detection prevents problems.
- Completely replace the entire nutrient solution every 10-14 days to prevent the buildup of specific salts and restore a balanced nutrient profile.
This regular « audit » of your water chemistry is the single most impactful routine for ensuring healthy, vigorous growth. It transforms gardening from guesswork into a form of applied science.
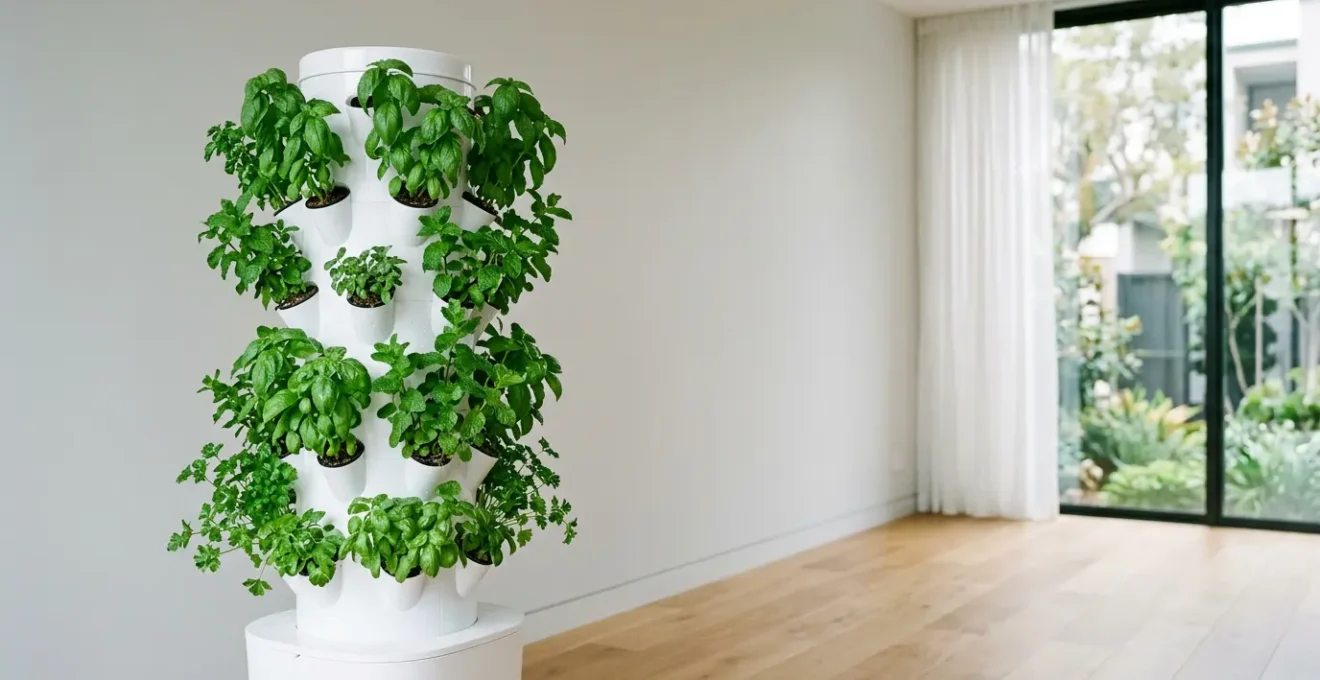
Lettuce vs Tomatoes: Which Plants Thrive in a Vertical Pipe System?
A common mistake for aspiring hydroponic gardeners is attempting to grow everything. While technically possible, a vertical pipe system is a specialized environment that strongly favors certain types of plants over others. The key to a successful and productive garden lies in selecting crops whose growth habits and root structures are compatible with the system’s design. This is a critical part of yield optimization.
The primary constraints of a vertical system are the small planting sites (often 2-3 inch net pots) and the confined vertical space for roots. Plants that are compact, fast-growing, and have shallow, fibrous root systems will thrive. Plants with large, aggressive root systems (like indeterminate tomatoes or cucumbers) or those that become heavy and require extensive support are poor choices for a simple vertical tower. They can clog pipes, overgrow their space, and become unstable.

As the illustration above conceptually shows, the fine, shallow roots of herbs and lettuces are perfectly suited to the limited space in a vertical setup. They can get all the nutrients they need without overwhelming the system. Leafy greens and herbs are the undisputed champions of vertical hydroponics. They offer a rapid « seed-to-harvest » cycle, allowing for continuous production in a small footprint. While you can experiment with dwarf varieties of other plants, starting with the right crops ensures early success and builds confidence.
The following table provides a clear ranking of plant suitability for a typical home vertical system:
| Plant Category | Growth Speed | Root System | Vertical Suitability | Best Varieties |
|---|---|---|---|---|
| Leafy Greens (Lettuce, Spinach, Kale) | Fast (30-45 days) | Shallow, compact | Excellent | Romaine, Butterhead, Baby Spinach |
| Herbs (Basil, Mint, Cilantro) | Fast (3-4 weeks) | Shallow to medium | Excellent | Genovese Basil, Peppermint, Cilantro |
| Strawberries | Slow to fruit (long-term) | Shallow, trailing | Good with support | Alpine, Seascape (everbearing) |
| Cherry Tomatoes | Medium (60-80 days) | Medium, requires support | Fair (determinate only) | Tiny Tim, Patio varieties |
| Cucumbers | Medium-Fast | Aggressive, can clog | Limited | Bush or dwarf varieties only |
PVC Pipe Garden: How to Drill and Assemble a Vertical Tower Cheaply?
With the core system, lights, and plant choices made, it’s time to build the physical structure. The internet is filled with designs for PVC pipe towers, but many require an array of power tools and complex cuts. For an apartment dweller, the goal is to achieve a functional and aesthetically pleasing result with minimal tools, cost, and complexity. The key is to choose a simple, proven design and focus on clean execution.
You don’t need a full workshop. The most critical tool will be a power drill and a hole saw attachment sized for your net pots (typically 2 or 3 inches). This single tool allows you to make all the necessary cuts for planting sites, eliminating the need for jigsaws or miter saws. For the pipe itself, using a square PVC fence post (e.g., 5×5 inch) instead of a round pipe can offer more stability and easier drilling on a flat surface. Assembly should rely on press-fit connections and standard PVC cement, which require no special equipment.
Many successful DIY designs have been refined by the community, offering a reliable path for beginners. One excellent example is the « Rain Tower » design.
Case Study: The « Rain Tower » Minimalist Build
A popular DIY project known as the Rain Tower System exemplifies a cheap and accessible design. According to an overview on Balcony Garden Web’s showcase of DIY ideas, this system uses a standard 5-gallon bucket as the reservoir, a 5×5-inch PVC fence post as the tower, and simple 3-inch PVC pipes to hold the net pots at an angle. The pump operates on a simple timer (15 minutes on, 15 minutes off), saving energy. The genius of this approach is its simplicity and the use of readily available materials, making it one of the most accessible designs for home growers with minimal tools.
To assemble your own tower based on this principle, focus on a few key steps that don’t require advanced skills:
- Measure and Cut: Have your main PVC post cut to height at the hardware store to ensure a clean, straight edge. Your only at-home « cutting » will be done with the hole saw.
- Mark and Drill: Use a template to mark the locations for your plant holes. Spacing them about 8-10 inches apart vertically and staggering them around the tower provides adequate room for growth. Drill slowly and carefully.
- Seal and Assemble: Use PVC cement to attach a solid end cap to the bottom of your tower. The top cap can be left unglued for access. All pump and tubing connections should be simple press-fit or require minimal tightening.
- Dampen and Silence: Place a small foam pad under your submersible pump in the reservoir to dramatically reduce vibration noise. A guide rope or chain inside the tower can also help guide the water down silently, preventing a loud splashing sound in your apartment.
Sheep’s Wool vs Fiberglass: Why Choose Natural Insulation for Your Loft?
At first glance, a discussion about loft insulation seems out of place. However, the core question—choosing between a traditional synthetic material (fiberglass) and a modern natural alternative (sheep’s wool)—is a powerful analogy for the material choices you make in your hydroponic system. This is a deeper level of system design thinking that moves from « what works » to « what is best for my specific environment and values. »
In home insulation, fiberglass is the cheap, established standard. It works, but it can be an irritant to work with. Sheep’s wool is a premium alternative that is not only effective but also offers secondary benefits like moisture regulation and being a natural, non-toxic material. How does this apply to your hydroponic tower? The parallel is in the choice of plastics. The default, cheapest option is standard PVC pipe from a hardware store. Like fiberglass, it works. However, it’s not designed for growing food.
A more « premium » and responsible choice is to ensure all components that touch your water or roots are made of food-grade plastic. This includes your reservoir (look for HDPE #2 plastic), tubing, and even the PVC pipe itself if you can source a food-safe or drinking-water-rated version. While standard PVC is generally considered stable, using food-grade materials eliminates any potential concern about chemical leaching into your nutrient solution and, ultimately, into your food. This is particularly important for the acidic nature of the nutrient solution, which can be more reactive than plain water.
Furthermore, consider the « insulation » of your reservoir itself. A black or opaque reservoir is non-negotiable to prevent algae growth. But you can go further. Just as insulation in a loft maintains a stable temperature, wrapping your reservoir can help buffer it from the temperature swings of your apartment. A more stable water temperature leads to healthier roots and more consistent nutrient uptake. You could use simple reflective insulation (like a car’s sun shield) or even build a simple wooden box around it. This is another example of moving beyond the basic design to actively practice environmental control.
Window Sill Gardening: How to Grow Organic Lettuce in a Small Apartment?
While a vertical tower is a fantastic project, it can feel like a big first step. What if you want to dip your toes into the world of hydroponics with an even simpler, smaller, and completely silent system? For this, we turn to windowsill gardening, not with soil, but with a brilliantly simple hydroponic technique known as the Kratky Method. This approach is the epitome of resource efficiency, requiring no pumps, no electricity, and minimal intervention.
The Kratky method is a passive, non-circulating form of hydroponics. It’s perfect for growing single heads of lettuce or small herb plants in something as simple as a Mason jar or a small container. This makes it ideal for an apartment dweller who wants to start small or doesn’t have the space or desire for a larger piped system. It’s the ultimate « set it and forget it » hydroponic technique.
Case Study: The Kratky Method for Passive Windowsill Growth
The Kratky Method is a game-changer for micro-scale indoor gardening. As detailed in guides for new growers, the technique involves placing a plant in a net cup that is suspended over a container of nutrient solution. The key is that only the bottom portion of the roots touches the solution. As the plant grows, it consumes the water, and the solution level drops. This automatically creates an expanding gap of humid air, which provides the roots with the oxygen they need to thrive. There are no air stones or pumps needed. It is a perfectly balanced, self-regulating micro-ecosystem, ideal for growing a head of lettuce from start to finish with just one initial setup.
To start with the Kratky method, all you need is:
- A container (a 32oz Mason jar, painted black or wrapped in tape to block light, is perfect)
- A net pot (2-inch is fine) that fits the opening of the container
- A growing medium (like a rockwool cube) to start your seed
- Hydroponic nutrients
You simply fill the jar with a mild nutrient solution, place your sprouted seed in the net pot so the roots can reach the water, and place it on a sunny windowsill. That’s it. You just watch it grow. This method offers a tangible, low-risk introduction to the principles of hydroponics: nutrient solutions, pH, and root health, without the complexity of a circulating system. It is the perfect gateway to understanding how plants can thrive without soil.
Key Takeaways
- Success in apartment hydroponics comes from making informed engineering choices, not just following a DIY recipe.
- Prioritize resilient systems (like DWC), full-spectrum lights, and plants with compatible root structures (leafy greens, herbs).
- Mastering the routine of monitoring and adjusting pH and EC is the single most important skill for a hydroponic gardener.
How to Create a Sustainable Home Environment That Reduces Your Carbon Footprint?
You’ve designed your system, selected your materials, and perhaps even started a small Kratky jar on your windowsill. You are on the verge of producing your own food. At this stage, it’s worth zooming out to appreciate the broader impact of this project. Building a vertical hydroponic garden is more than just a hobby; it’s a practical step toward creating a more sustainable home environment and actively reducing your personal carbon footprint. This is the ultimate « why » behind your project.
The most immediate impact is on your « food miles »—the distance your food travels from farm to plate. The lettuce and herbs you typically buy in a supermarket have journeyed hundreds, if not thousands, of miles, consuming fossil fuels every step of the way. By harvesting greens from your living room, you reduce that journey to zero. This is the most local food you can possibly get. This act of « hyperlocal » food production directly shrinks the carbon footprint associated with your diet.
Furthermore, you gain complete environmental control over your food’s inputs. You decide what nutrients your plants receive. You can ensure there are no pesticides, herbicides, or fungicides used, guaranteeing truly organic produce. This level of control and transparency is simply not possible with most store-bought food. Finally, hydroponics itself is a model of resource efficiency. When managed correctly, a closed-loop hydroponic system uses up to 90% less water than traditional soil agriculture, a significant contribution to conservation, even on a small scale.
Creating this small, productive ecosystem in your apartment does more than just provide food. It reconnects you with the process of growth, provides a rewarding and educational experience, and serves as a tangible, daily reminder of your commitment to a more sustainable lifestyle. Your vertical garden becomes a living statement, demonstrating that with thoughtful design and a little bit of science, urban living and sustainable food production can go hand in hand.
Your journey from an apartment dweller to an indoor farmer is now laid out. The next step is to move from planning to action. Start by designing your system on paper, sourcing your materials, and embarking on the rewarding process of building your own source of fresh, sustainable food.